Text Overflow Rules
The Text Overflow rule allows Designers to manage a series of text boxes that contain a sequence of text. The Text Overflow lets you flow text from one text box to another so when the first text box is full, ContentWelder automatically moves to the next text box and fills it. If you add or delete text in a text box, ContentWelder Designer adjusts the text in the subsequent text boxes accordingly.
Text Overflow can be thought of as the linking of text boxes when a build (Preview or Print Ready) is requested. Like linking text boxes in InDesign, the Text Overflow Rule will link one textbox to another, so all text entered is displayed rather than being cut off.
Text overflow occurs during the build process and will appear in the output PDF in ContentWelder.
Basic Text Overflow
This section provides a list of scenarios, in increasing complexity, that demonstrate how Text Overflow can be used.
Setup
- Create a Personalized Catalog item and give it a title of "Text Overflow".
- Click the "Open in Designer" icon.
- You will now see the screen with a blank page.
- Add two text boxes to the stage as seen in the screenshot below.
-
In the above example, the arrows indicate the two textboxes.
-
Edit "Textbox A" to add enough text so that it doesn't fit. It is important that you enter enough text to overflow/overset "Textbox A". If all of the text that you enter fits, then you will not see a difference when you apply the overflow rule.
-
Ensure to change the Labels for each Textbox A, this becomes increasingly important for keeping track of things as you add more Textboxes. For this example, Textbox A has been given a label of "Textbox A" and the second textbox has been given a label of "Textbox B".
Configure Text Overflow
- With "Textbox A" still selected, click the Rules tab on the right side of the Designer stage.

-
You are now presented with a list of Rules. Refer to the Rules section for more information on the other rule options in Designer.
- Navigate to the "Overflow" row and click the Add button.
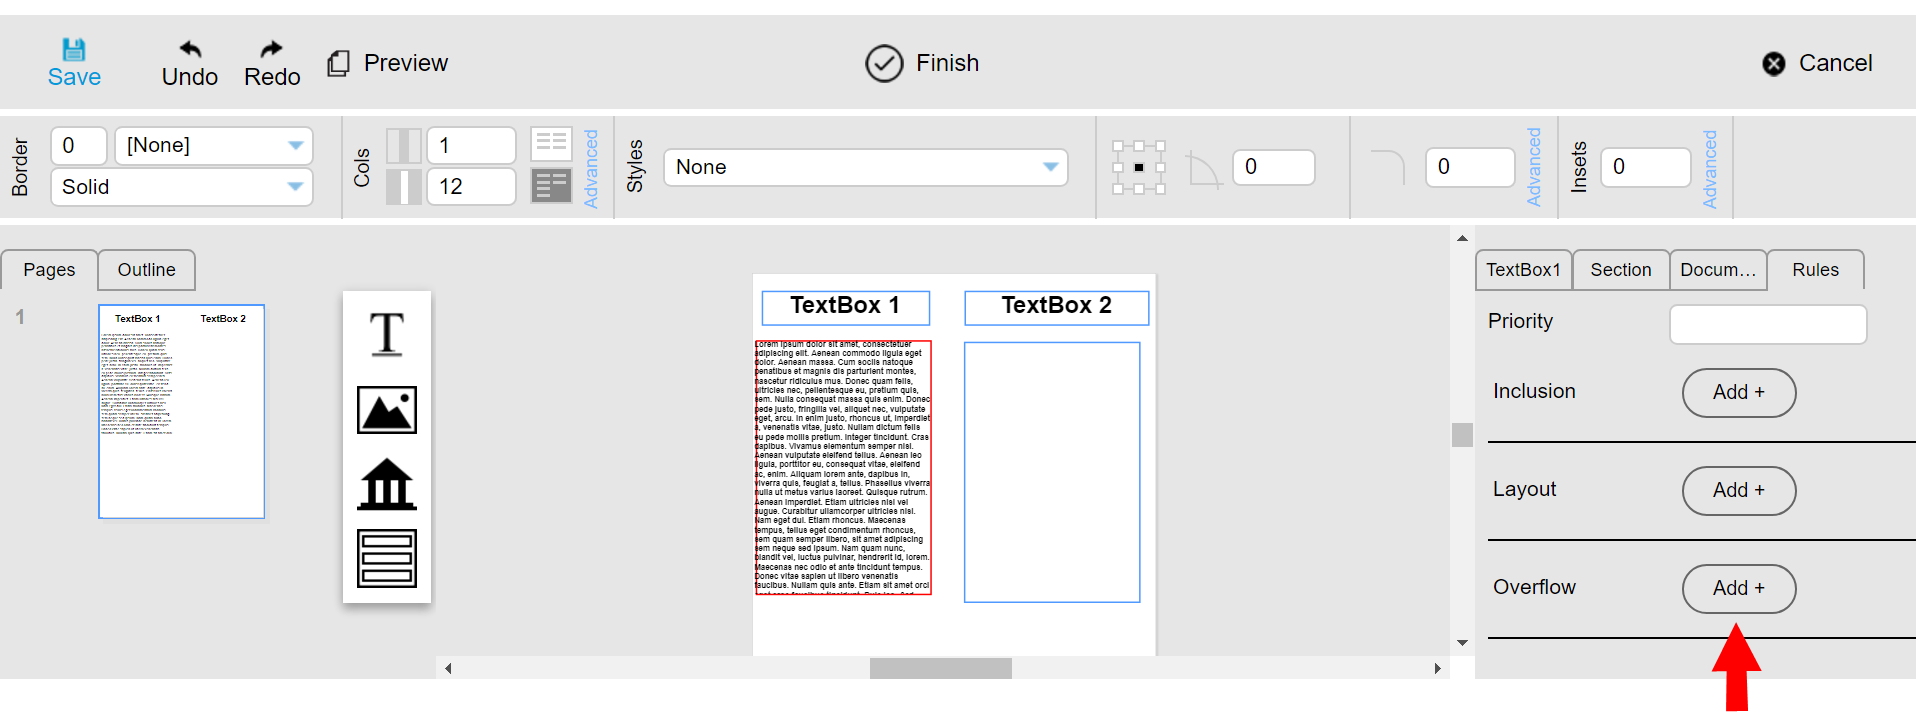
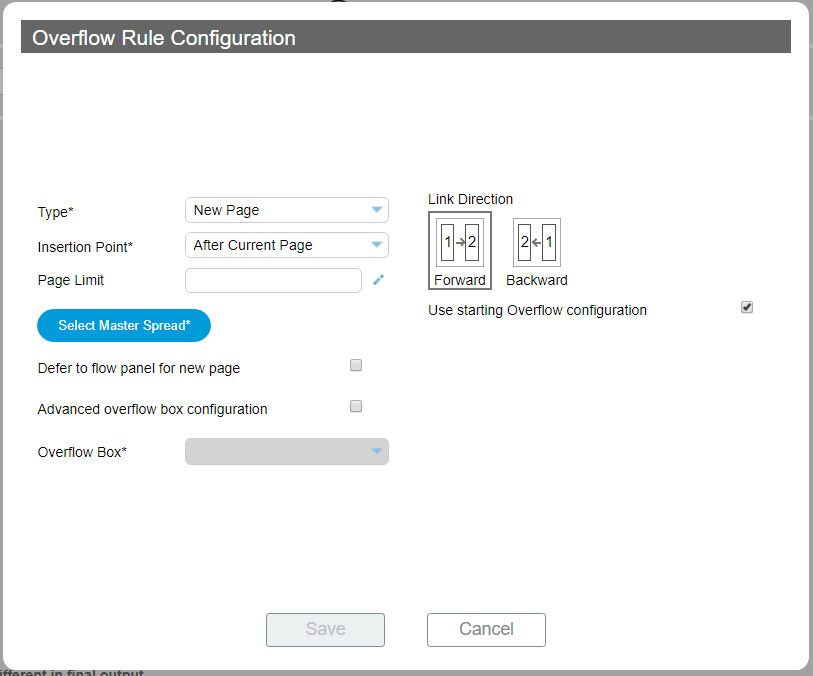
- The Overflow Rule Configure screen will appear.

Name Description 1 Type This option allows you to select the page containing the text from which the overflow text will be selected from. Options are:
- Existing Page: Allows you to overflow to a page that currently exists in the document that you are working in.
- New Page: Allows you to pull a page from the content library (Shared Document) and have it inserted at build time. This eliminates the need to create a single document where you must manually configure overflow rules for each permutation.
2 Advanced overflow box configuration Check this option to add a JavaScript condition to process the overflow content. This configuration is done in the Overflow Box* field. 3 Overflow Page* If the Advanced overflow box configuration field is unchecked, you can select the page containing the overflow content from a drop-down menu. If the Advanced overflow box configuration field is checked or selected, you can create a JavaScript condition to process the overflow content. 4 Overflow Box* This option contains a list of text boxes in the document. Select the text box which will contain the text that did not fit on the main text box. 5 Link Direction The direction of the text overflow is configured with this field. 6 Use starting Overflow configuration Checking this option allows you use the initial overflow rule for subsequent text overflow. Instances where text overflow from pages other than the starting or first page must be used, then this option must be unchecked. - Since we only have a single page in our document, we will leave the Type as "Existing Page" for now.
- For the "Overflow Page" prompt, since our document currently only has a single page, choose the first item on the list.

- For the Overflow Box prompt, choose "TextBox B".
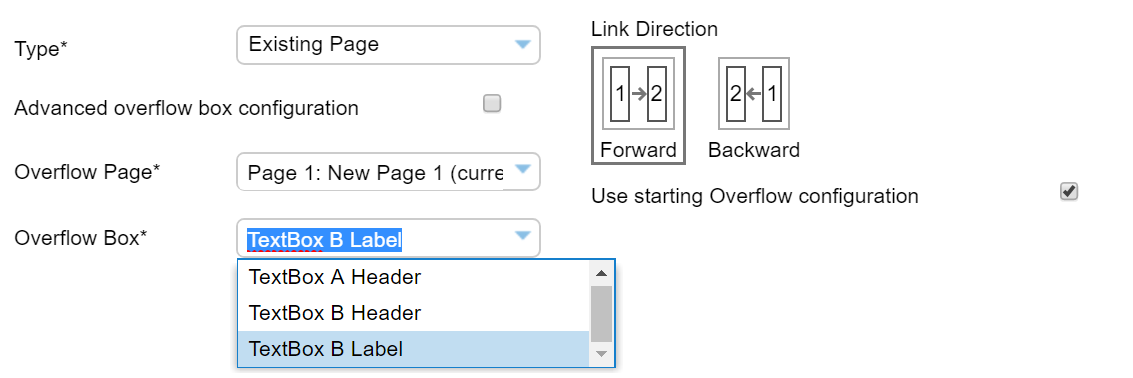
Remember: We changed the label of the second TextBox to "TextBox B Label" so it is important to label your page items with meaningful labels.
- For the "Link Direction" option, leave the "Forward" default option selected.
- Click the "Save" button to save the configured options.
View Results
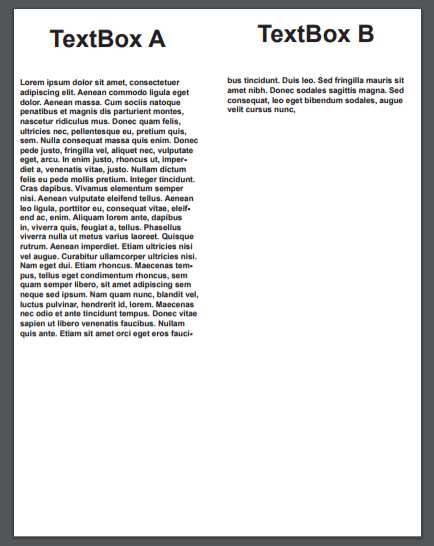
At this point, we have configured Textbox A to overflow/link to Textbox B if the text entered overflows. To see what the result will look like, we need to request a preview.
- Click the "Preview" button to request a preview.
- Once the build is finished, click "View Preview".
- This opens the PDF preview.
- Here we see that text has overflowed from Textbox A to Textbox B.

Overflowing Multiple Times
In the “Basic Text Overflow” example, text overflowed a single time. From Textbox A to Textbox B. But what if text took up all the space in Textbox B, and there was still more text that didn’t fit?
This scenario will guide you through how to “chain” your overflow rules when dealing with scenarios where the length of text entered can vary significantly.
- If you still have the document from “Basic Text Overflow” open, then continue. Otherwise, repeat the setup steps from “Basic Text Overflow”.
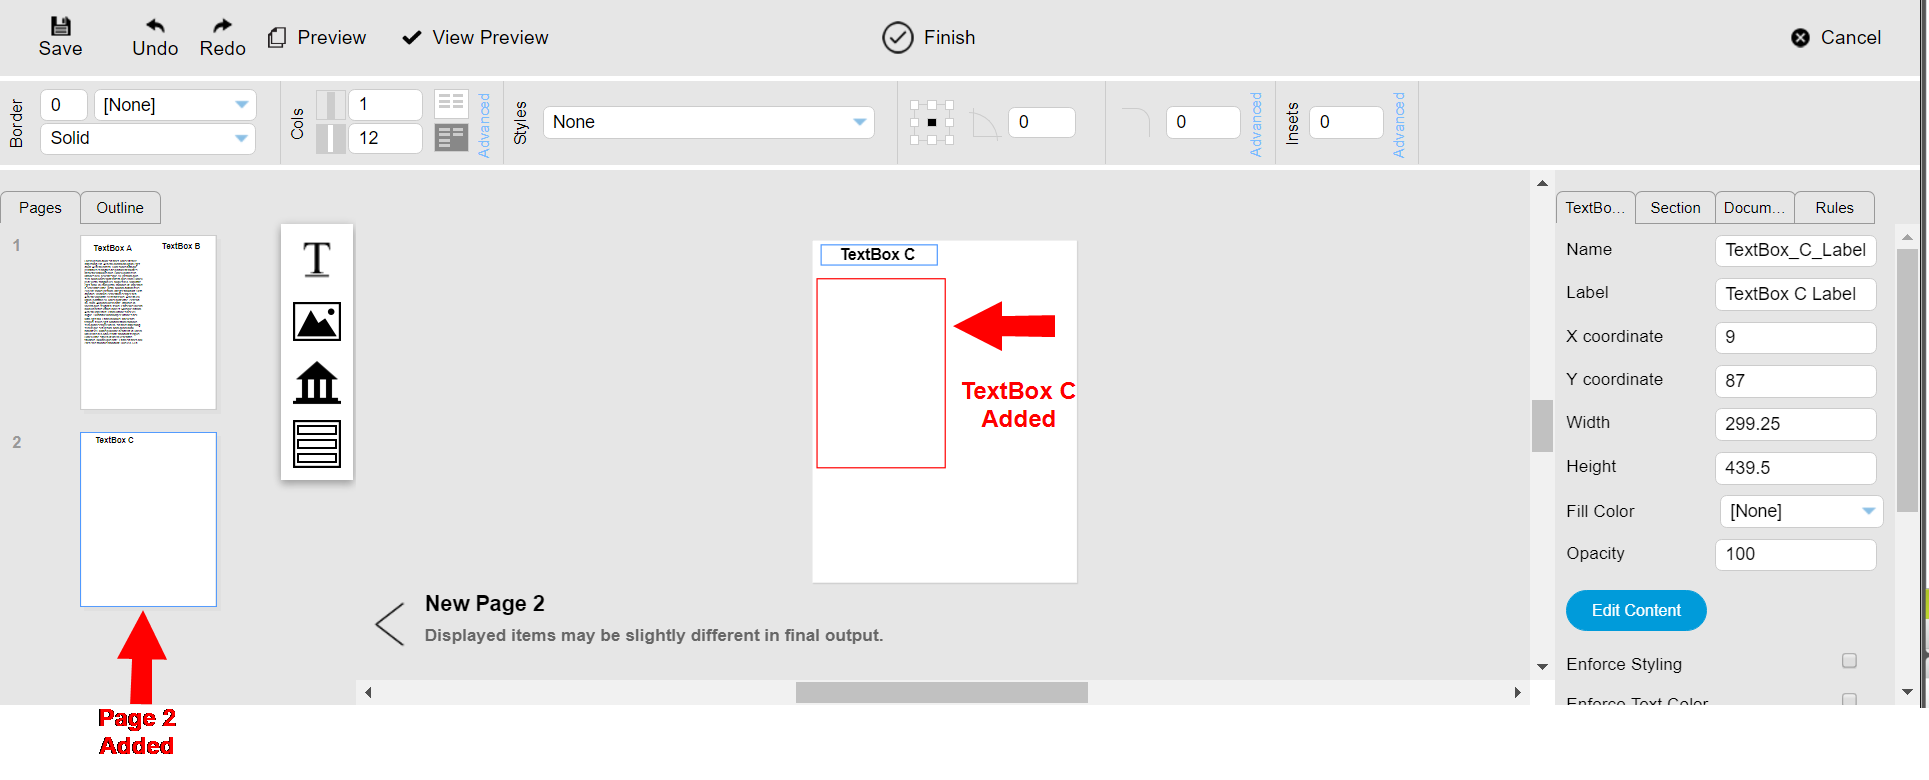
- Since the first page already has two text boxes on it, let’s add a new page to our document. Add a new page to your document (page 2).
- Add a text box to page 2. Remember to give this text box a name and label that will help you identify it later.
- For documentation purposes, we’ve labeled this box as “Textbox C”.
- Below is a screenshot showing the new page we added, as well as the new text box.
Now that we've added the new text box that we want to use to overflow the extra text to, we need to make some adjustments to Page 1 to leverage the new text boxes.
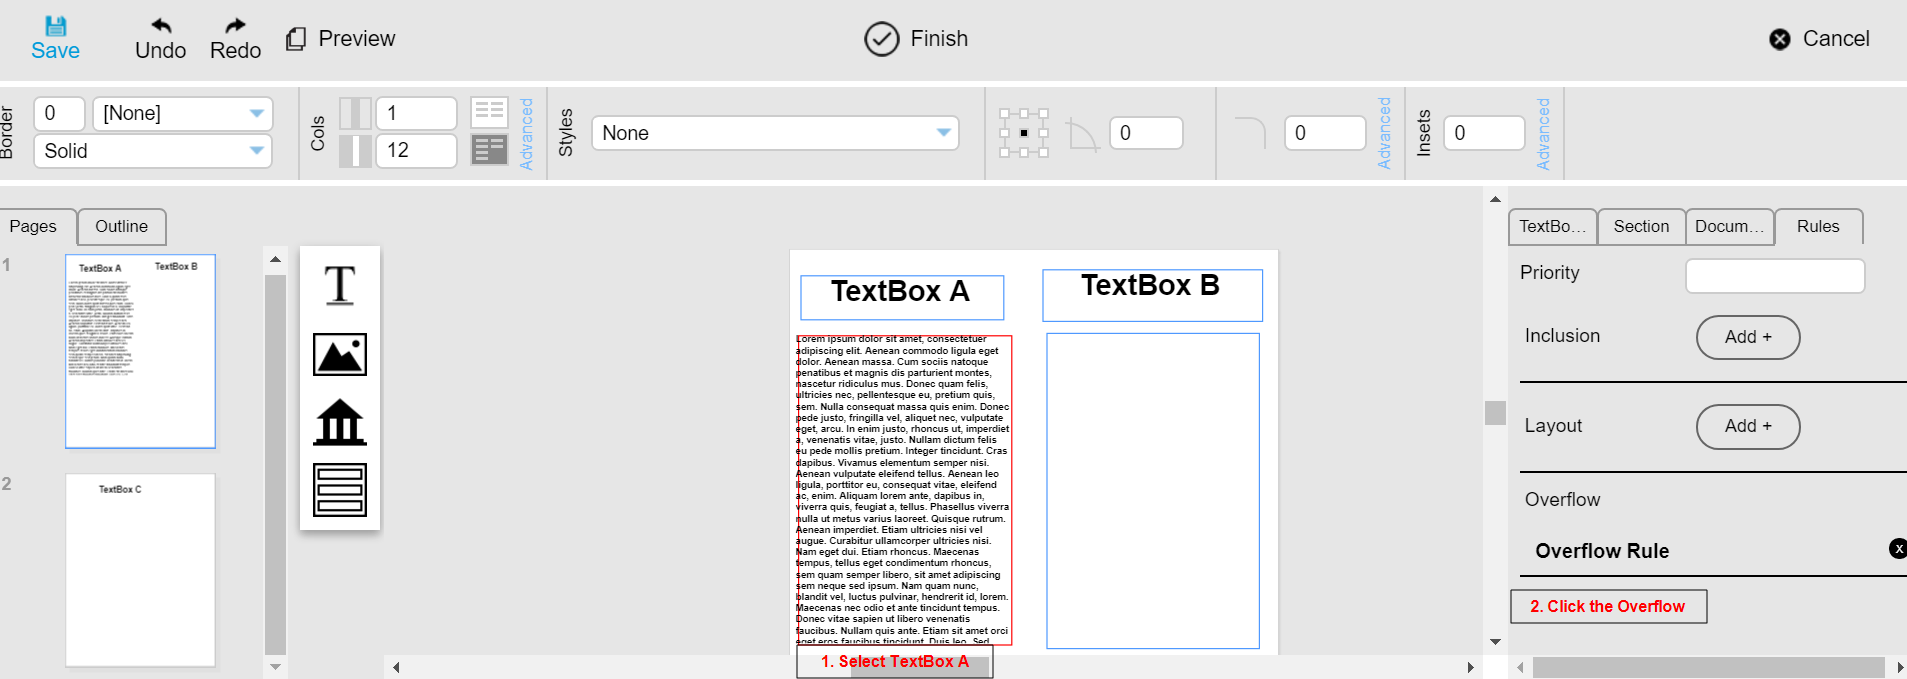
- Return to the first page and select "TextBox A".
- Go to the "Rules" tab.
- Click on the existing "Overflow Rule".
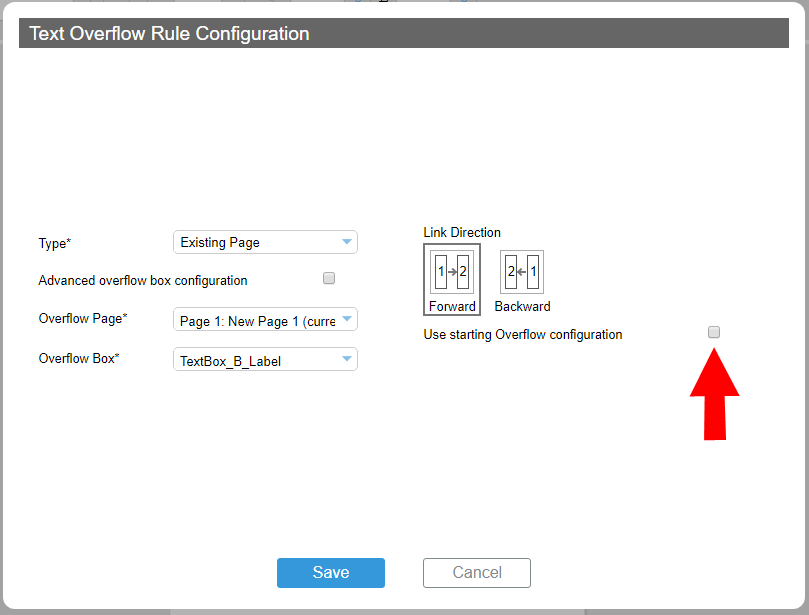
- Once the overflow configuration dialog box opens, uncheck the "User starting overflow configuration" option. Unchecking this field allows you to direct the overflow not to process the extra text from TextBox A.
- Click the Save button.
Configure Page Two Overflow Rule
- Select the "TextBox_B_Label" as the overflow box and located on page 1.
- Click on the Rules tab and add a new overflow rule.
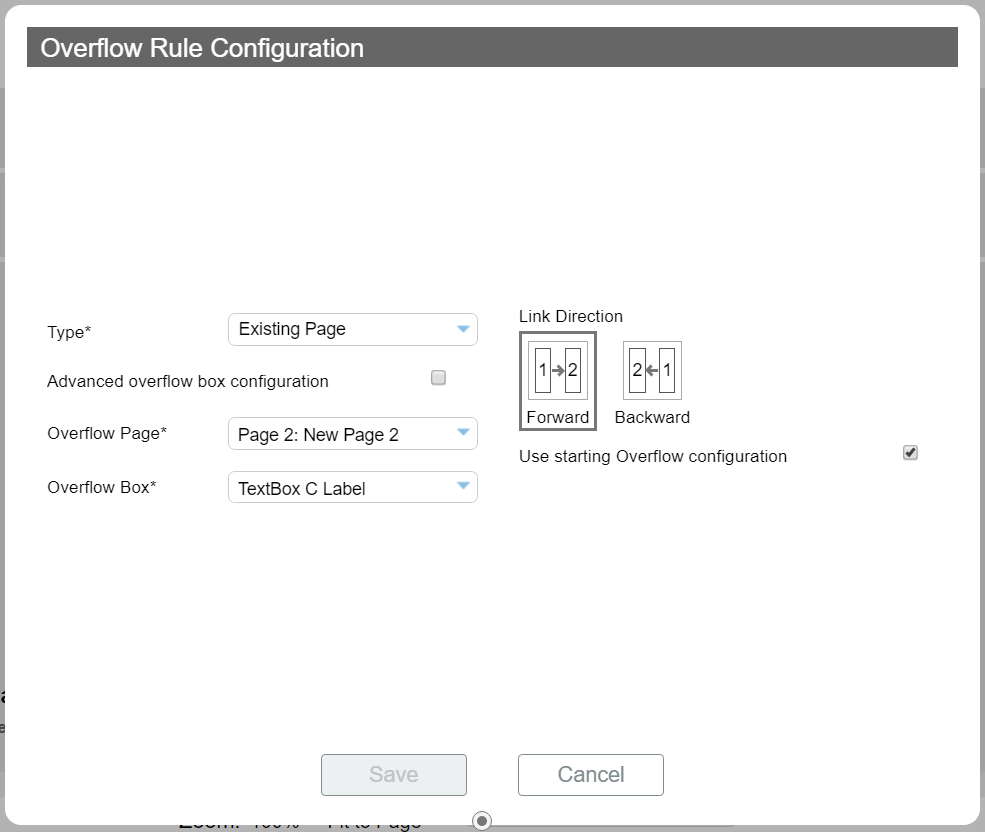
- Since we want text that doesn't fit in TextBox B to overflow to Textbox C on page 2, this time, we will select "page 2" for the overflow page. Choose "Textbox C" for the overflow box as shown below.
- Click the Save button.
Important: Text only overflows if it doesn’t fit into the current text box. For our example, additional text was added into Textbox A to ensure that after it overflows into Textbox B, that text would still not fit.
In this example if, text overflows from Textbox A to Textbox B, and all the text fits. Then, the overflow rule on Textbox B is ignored.
View PDF Results
We have now configured text to overflow:
- From Textbox A to TextBox B on Page 1.
- From Textbox B on Page 1 to Textbox C on page 2.
- Click the "Preview" button to request a preview.
- Once the build is finished, click "View Preview".
- This opens the PDF preview.

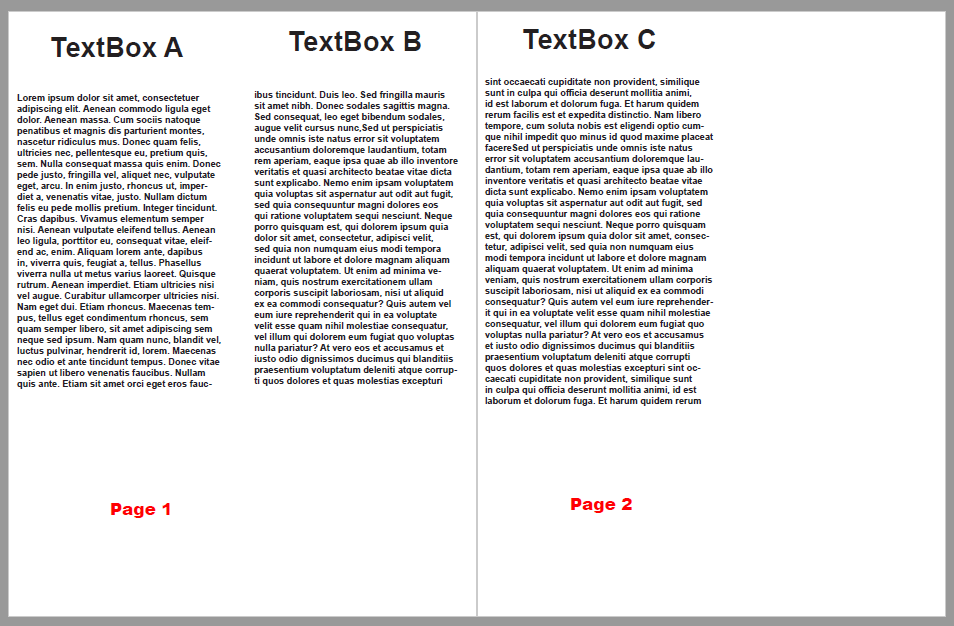
Here we can see the result of chaining our overflow rules.
- Text flowed from Textbox A to Textbox B on page 1
- Because text still didn’t fit in Textbox B, the overflow rule on Textbox B was used to overflow content to Textbox C on page 2.
With this type of ‘chaining’ of rules, you can configure a document to overflow in several different ways.
Note: It’s important to always remember to uncheck the “Use starting Overflow configuration” if you plan to chain your overflow rules in this manner. Not doing so would result in text flowing from Textbox A to Textbox B, and stopping there.
So far, we’ve only dealt with the “Existing Page” as the overflow type. The “New Page overflow type section” looks to address this problem.
Overflowing to Text Boxes with Different Columns and Borders
When text overflows from one box to another, only the text content overflows. Properties of the original text box do not carry over to the new text box.
Steps to follow
Continuing with the steps defined in Overflowing Multiple Times, perform the steps below:
- Select Textbox B on page 1.
- Change the properties of Textbox B as follows:
- Set the column count to 3
- Set the rounded border to 12
- Set a 1 point black border
- Request a preview and you see something like what is below.
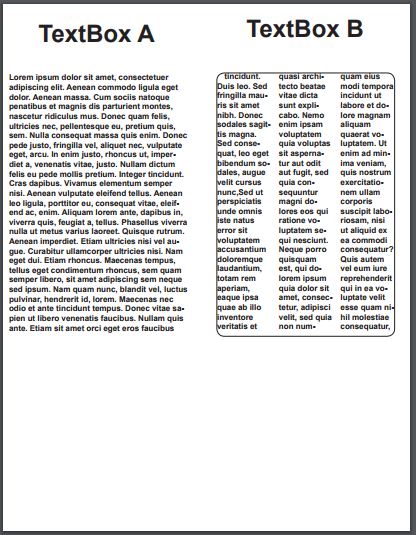
When can see with this example, while the same story will overflow from Textbox A to Textbox B, the properties of
Textbox B are maintained.
For real world example, such as newsletters, this allows you to have a text box on page 1 overflow to page 2 where there is more real estate. Typically, page 1 of newsletters use more real estate of visuals and contact information. Whereas page 2 and beyond have more room for text.
New Page Overflow Type
It is important to note the difference between an "Existing and New page in the Overflow configuration screen.
- Existing Page: Allows you to overflow to a page that currently exists in the document that you are working in.
- New Page: Allows you to pull a page from the content library (Shared Document) and have it inserted at build time. This eliminates the need to create a single document where you must manually configure overflow rules for each permutation.
This section will demonstrate a practical example of this.
Steps to Follow
Below we have a screenshot that shows a 2-page document. This is a basic newsletter.
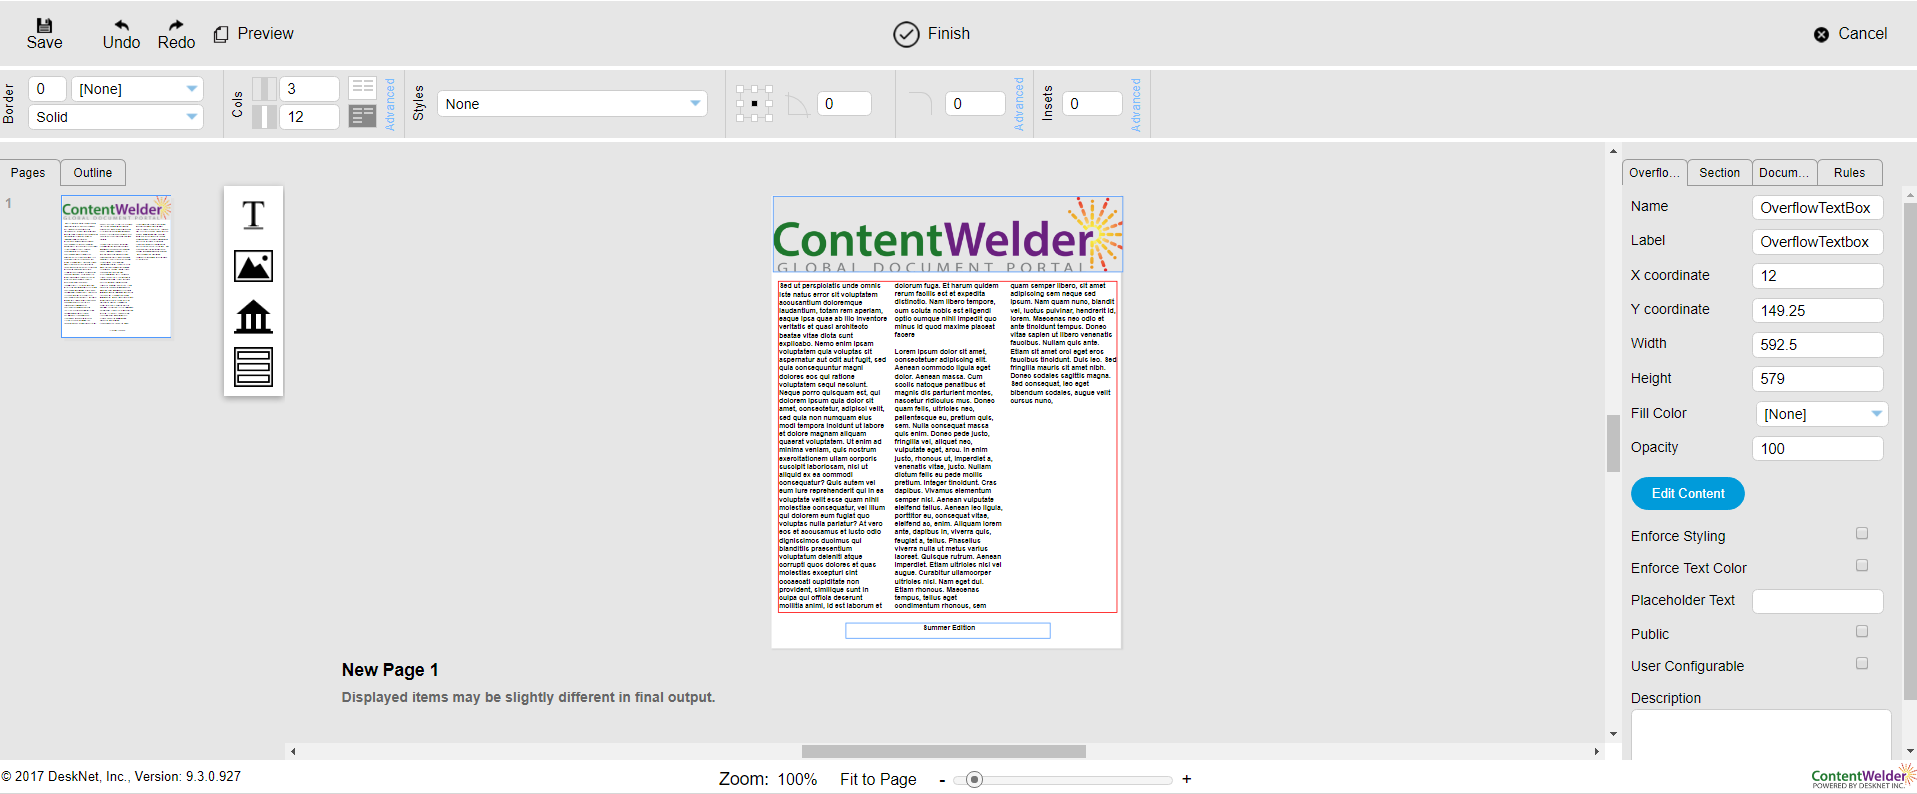
The cover page contains the following:
- Company branding
- Publication date
- Title
- Contact information
- Company story
The page also contains disclaimers.
The problem to address is that:
- Users will be able to enter content of an undetermined length into Textbox A.
- The business wants to give the end user the freedom to express themselves. This means there won't be a limit how text they can enter.
To display all the content the user enters in Textbox A:
- Must leverage overflow rules.
- Because we don't know how long the text will be, we need to insert new pages to satisfy to ensure content fits.
Create Shared Document
Before we can specify what page to insert during the overflow process, we must first setup this page. Documents
that are inserted in this fashion are referred to as "Shared Documents".
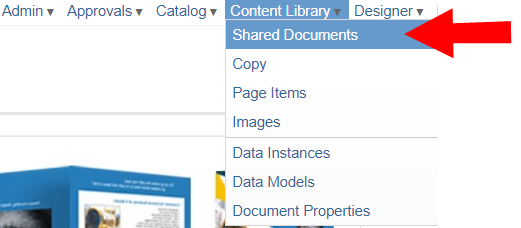
- Access the Shared Documents view by clicking Content Library and then Shared Documents menu option in ContentWelder.
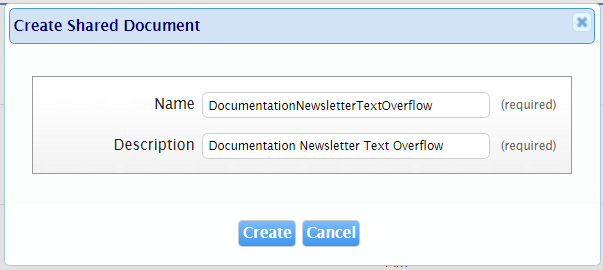
- On the Shared Documents page, click the +Create Shared Document button to load the Create Shared Document screen. Input a name for your document and description then click the Create button. For demonstration purposes, we've given the name of the shared document "DocumentationNewsletterTextOverflow".
- Let's setup the look and feel of our page.
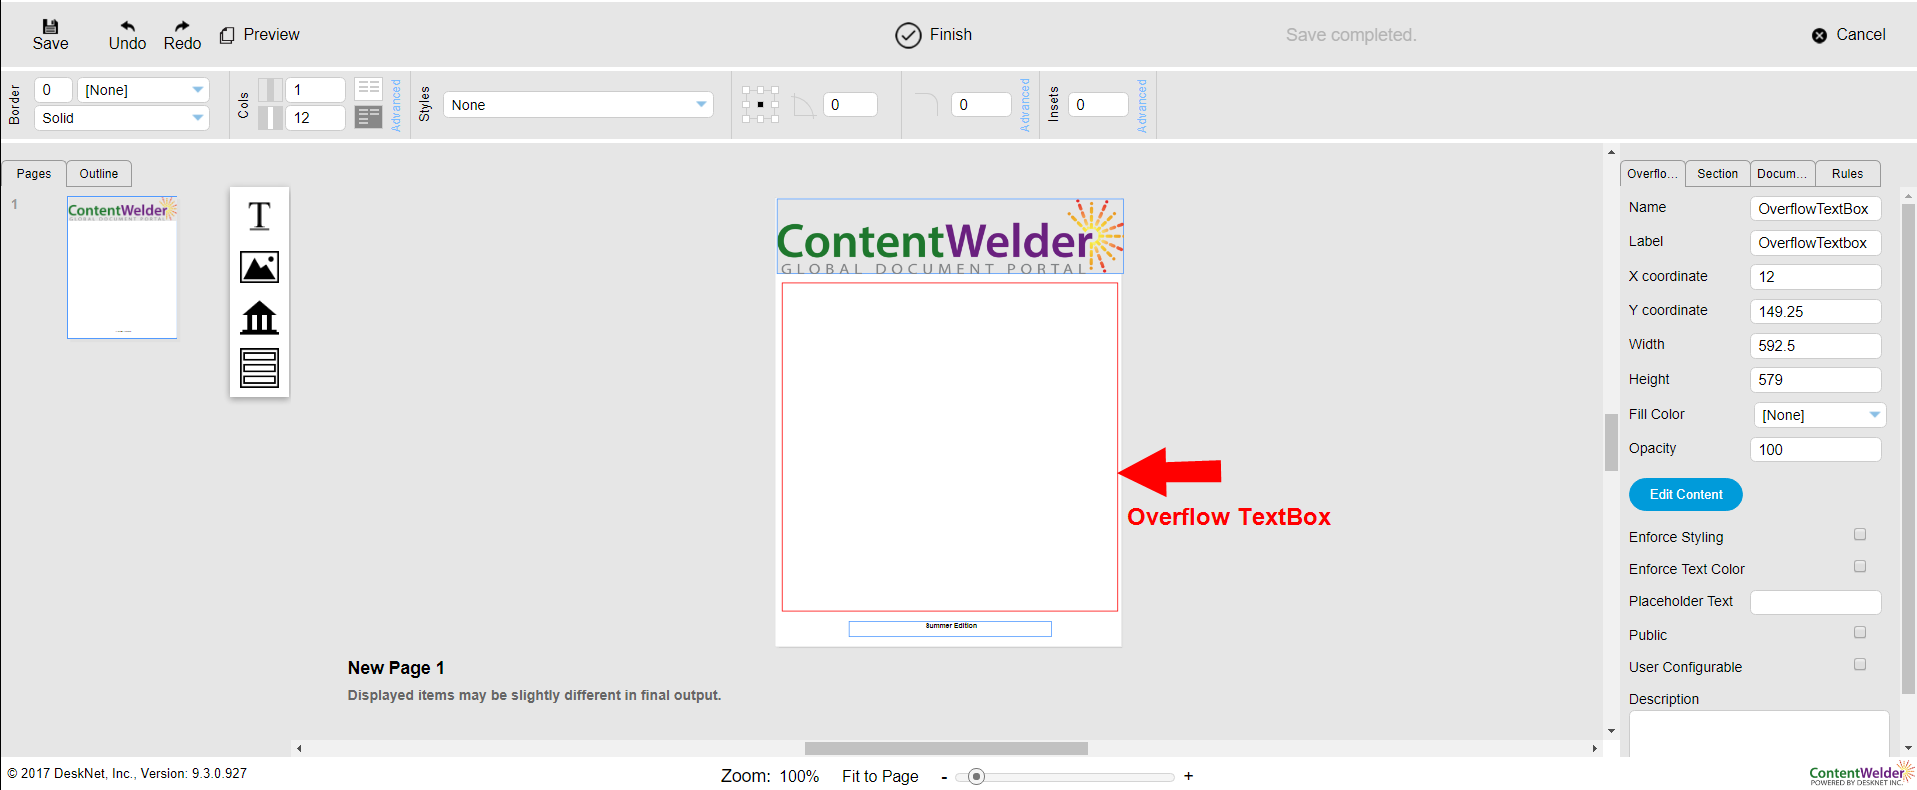
- Here we can see that we have created a page that contains the following:
- Branding logo
- The text box that we want to overflow to:
Remember to name your text box with something that you can easily use to identify later.
The text box has a label of "OverflowTextBox".
The text box has 3 columns.
-
Click the Finish button.
You are redirected to ContentWelder Designer, with a blank page.
We have now setup the document that will be inserted whenever text needs to overflow in our Newsletter. We now need to return to our "Newsletter" catalog item.
IMPORTANT: Shared Documents used for overflow can only contain one page. Shared Documents with more than one page are not eligible to be used for overflow at this time.
Tag Document to Overflow to New Page
- Return to the Catalog items view.
- Click "Open in Designer" for the Overflow text box document you created in the Basic Text Overflow section.
- Select "Textbox A".
- Go to the Rules tab and click on the existing overflow rule.
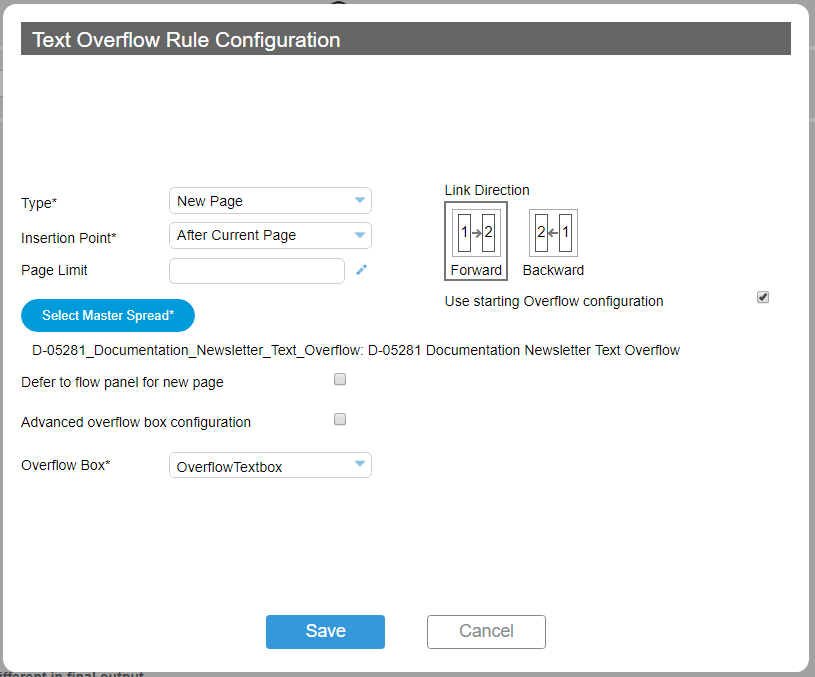
- Select "New Page" from the "Type*" drop-down field.
- Leave the insertion point as "After Current Page" for now.
- Select the "Select Master Spread*" field.
- Leave the page limit field empty for now.
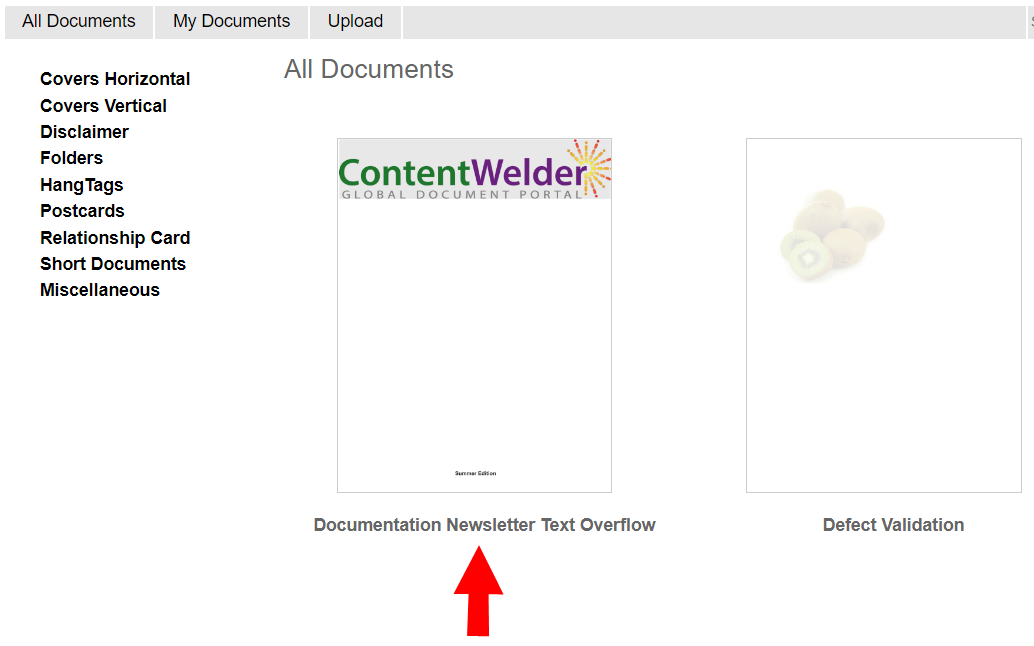
- You will be presented with a list of available shared documents. Select the "DocumentationNewsletterTextOverflow" document you created earlier by clicking on it.
- Select "OverflowTextBox" from the Overflow Box* field. Remember, this is the name of the box we defined in the Create Shared Document section.
- Ensure the "Use starting Overflow configuration" option is checked.
- Click the "Save" button.
Steps to Follow
- Click the "Preview" button to request a preview.
- Once the build is finished, click "View Preview".
- This opens the PDF preview.
-
Note: Depending on how much text you've entered in "TextBox A", on Page 1, you may have more or fewer pages inserted by the overflow process.

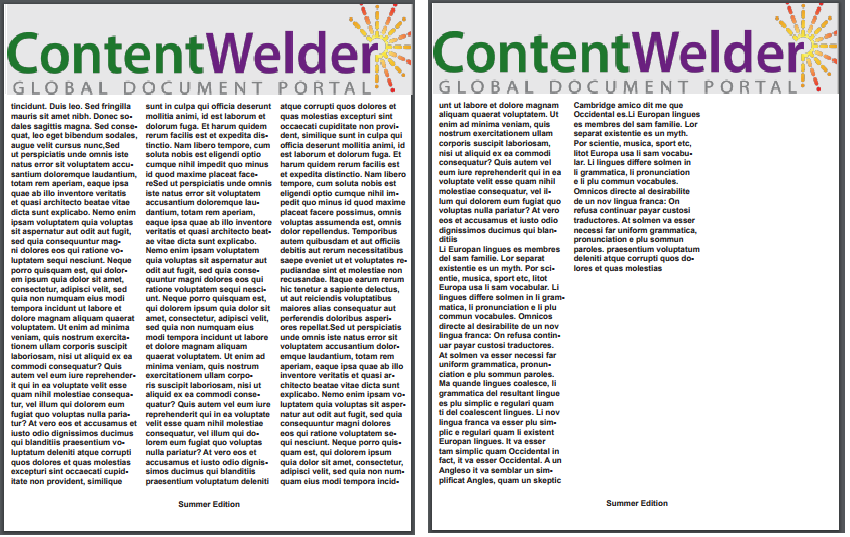
Looking at the resulting PDF, we can observe the following.
- The number of pages increased in the document because the insertion point in the overflow rule was set to "after current page".
- Page 2 was inserted after the first page:
- The system used the "Newsletter Text Overflow" shared document when inserting the new page.
- The branding on the shared documents was maintained.
- Once page 2 was complete, the system identified that the text still overflowed because the insertion point was set to "after current page".
- Page 3 was inserted after page 2:
The system used the "Newsletter Text Overflow" shared document when inserting the new page.
- The branding on the shared documents was maintained.
- After page 3, all of the text entered in "Textbox A" fits.
- Overflow stops inserting new pages.
- Page 4 (back page).
Unlike the previous example, where each possible overflow permutation had to be manually specified, the New Page type will automatically insert a page if there is a need.


